Attention - Click here for instructions on NG511 port ordering
This document is a quick guide for safely installing and implementing KerioControl Boxes NG510 and NG511 UTM appliances.
During installation follow these security instructions:
The appliance should be placed on a flat surface or securely mounted horizontally in a rack enclosure.
The NG510/NG511 series are intended primarily for server rooms due to noisy performance.
Do not attempt to open or disassemble the appliance for any reason.
Strictly follow the installation instructions (see section 3).
Do not place the appliance near a heat source.
Place the appliance in a ventilated space, making sure that the appliance fans and vents are unobstructed at all times.
Do not expose the appliance to liquids of any kind.In the event of liquid intrusion,unplug the appliance immediately.
Verify that the voltage and frequency of the power socket matches the values printed on the power adapter before plugging in the appliance. Use only the power adapter supplied with the appliance.
Do not place any items on top of the power cable; keep the power cable away from walkways or other areas where it could pose a tripping hazard.
KerioControl Box NG510 —1U rack mountable appliance
KerioControl Box NG511 —1U rack mountable appliance
| Feature | Description |
|---|---|
| Serial port | Used for connecting to a console with a serial cable |
| USB ports | Input for USB devices |
| Ethernet network ports | Used for connecting to the Internet and the LAN with an Ethernet cable |

Screenshot 1: KerioControl Box NG510 (front)

Screenshot 2: KerioControl Box NG511 (front)
After you have set the appliance at a suitable place and plugged it into a power outlet according to the safety instructions,it is time to connect it to the network and configure settings.

Screenshot 3: Connecting KerioControl Box NG510 to the network

Screenshot 4: Connecting KerioControl Box NG511 to the network
To configure the appliance:
Connect the Internet port to the Internet (e.g.DSL or Cable modem) using an Ethernet cable.
Connect the LAN port to the computer that will be used to configure the appliance (see the figures above).
Turn on the appliance.
Now you have two options:
Add and manage the appliance through MyKerio. See https://go.gfi.com/?pageid=ControlMyKerio.
Access the KerioControl Administration through a browser (see below):
Set the networking preferences for Ethernet on the connected computer to “Automatic DHCP configuration”. (You can change it later after the configuration is complete).
Renew the DHCP lease on the computer and confirm it has an IP address of 10.10.10.11
Open a web browser and connect to the KerioControl Administration web interface using the following URL: https://10.10.10.1/admin.
Ignore the SSL certificate warnings and proceed to the configuration wizard.
Follow the instructions provided by the wizard and configure the appliance.
See https://go.gfi.com/?pageid=ControlActivationWizard.
For troubleshooting purposes, you can use the serial port to connect the console to the appliance. See https://go.gfi.com/?pageid=ControlSerial for details.
For further assistance with configuration refer to additional documentation in https://go.gfi.com/?pageid=ControlManual.
For online support, resources visit https://support.gfi.com/ or https://forums.gfi.com for community based support.
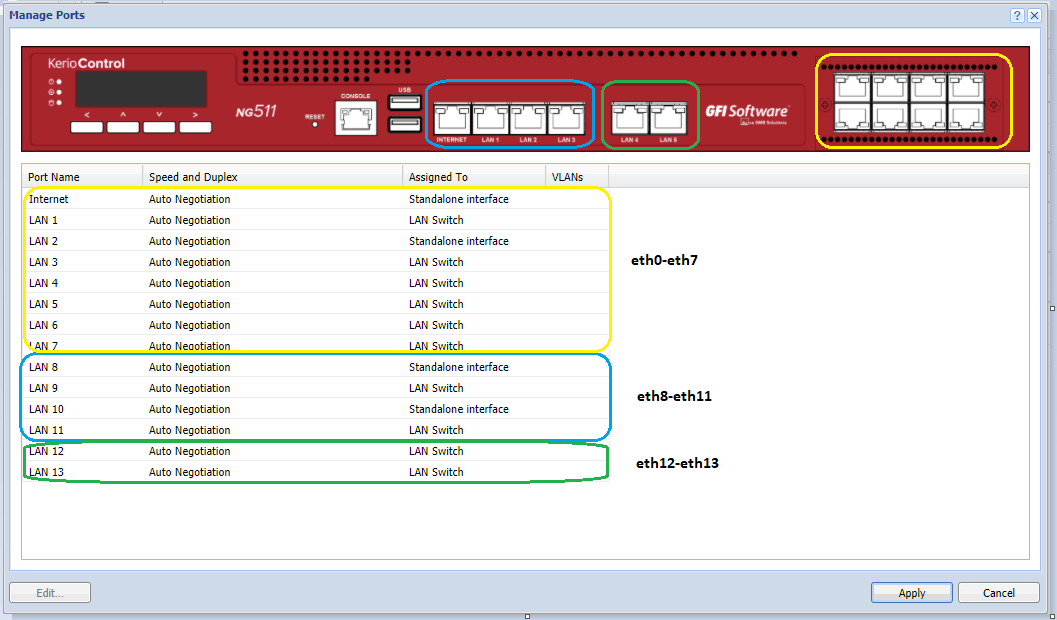
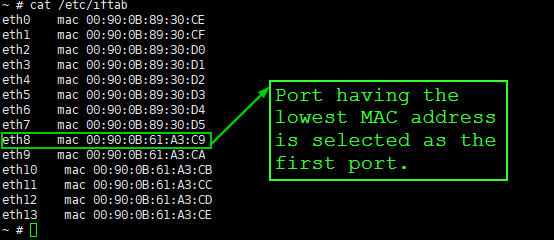
While configuring ports and physical cables on KerioControl NG511 hardware box, the default WAN (Internet) interface is not being assigned as eth0. There is a naming discrepancy in Mac addresses of eth0 reported from Webadmin and on the physical device itself.

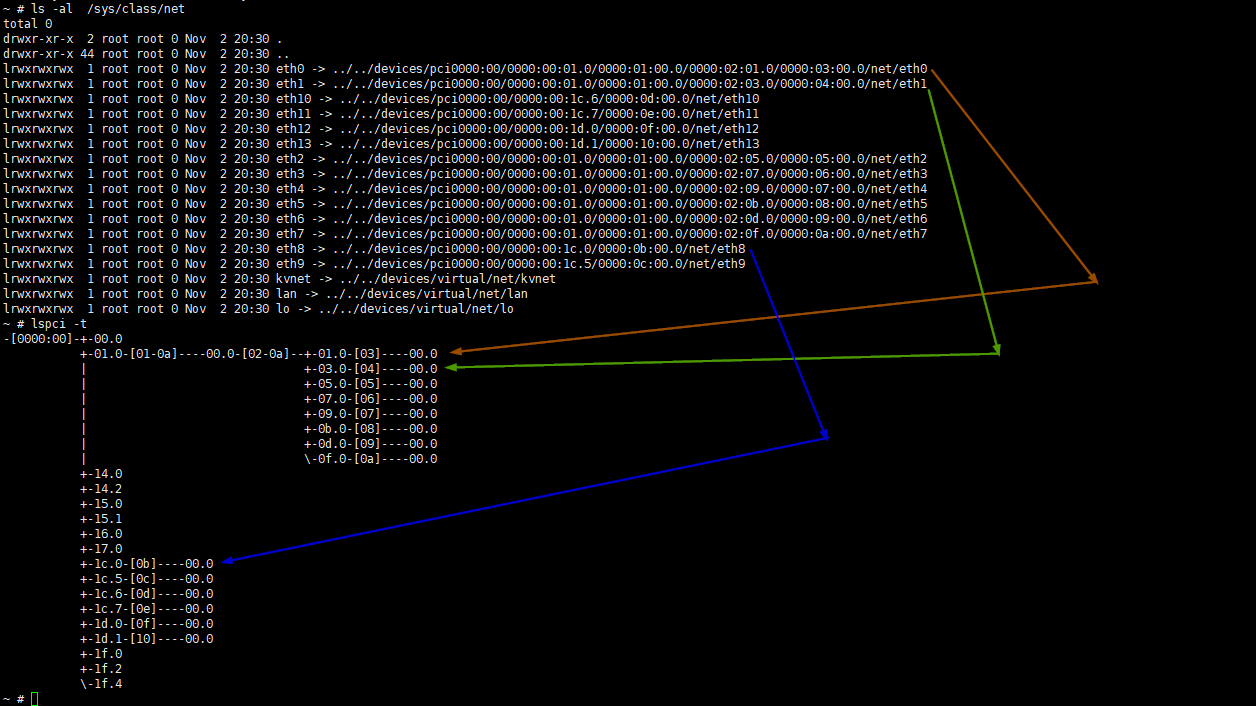
The 8-port group on the right is always connected to the first PCI bridge of the motherboard. That is, these 8 ports have always lower PCI bus addresses compared with the other 6-port group.

Linux udev system automatically assigns "ethX" labels starting from the port having the lowest bus address.

So, labels are always starting from 0 (zero) on the 8-port group.
The first port on the front panel having the label "Internet" is always assigned as "eth8" which is the 9th in the order.
KerioControl selects the "first" port as one having the lowest MAC address.
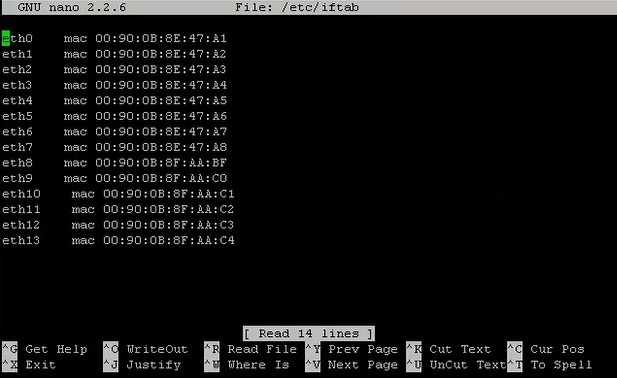
In brief, the hardware design of the NG511 box results in the 8-port group appears in the front (eth0-eth7) and the other 6-port group next (eth8-eth13). You can still change "ethX" labeling by modifying the "/etc/iftab" file.
Login to the KerioControl via SSH or serial console.
Make the system read-writable by executing the following command:
mount -o remount,rw /
Open the /etc/iftab using Nano or Vim. Switch the eth0 and ethX (in this case eth0 and eth8) Mac addresses and save the changes.

Reboot KerioControl.
Important: the software fix for the incorrect labeling is expected to be released by the end of Q4 2020.